Posts

Showing posts from March, 2012

Co-Hosting Tuesday Time Out Link Party

Image
This week, I'm co-hosting the Tuesday Time Out Party with  Reasons To Skip The Housework !  Feel free to link up here or there, the party will show up on both of our blogs!   Have fun! <a border="0" href="http://reasonstoskipthehousework.blogspot.com" target="_blank"><img src="http://i946.photobucket.com/albums/ad308/azparis3/timeout.jpg" /></a>  

Our Current State

Image
Over the weekend we sold our family room furniture.  I wasn't in love with our sectional and wanted something new.  Hubby was on board so I was on a mission to get rid of the old and bring in the new.  Our new furniture is scheduled to arrive this week.  It's another sectional but a lot larger and all one color.  I think the two tone of the last sectional was starting to bug me. I can't wait to re-decorate!  I've got some ideas in mind.   

Paper Mache Letters

Image
I've been wanting some "EAT" letters in my kitchen but just haven't gotten around to buying them.  I saw this on Pinterest one day and pinned it to my project board .  I could do that.  I have cardboard laying around and paper mache is easy, I think.  It's been a while. I started by choosing a font I liked in Word and made the letters really big.  I cut them out and traced them onto cardboard.  Remember, you need the front and back of the letters. Cut strips of a cereal box to create the depth of your letters and tape to the front and back. After constructing, it's time to paper mache.  I mixed one cup of water with one cup of flour.  Rip some newspaper into strips, I used a phonebook.  Dip the newspaper into the mixture and cover your letters.  Allow to dry completely.  I only used one layer but you could do another if you feel like it. After my letters were dry, I painted them with red craft paint.

Let There Be Light

Image
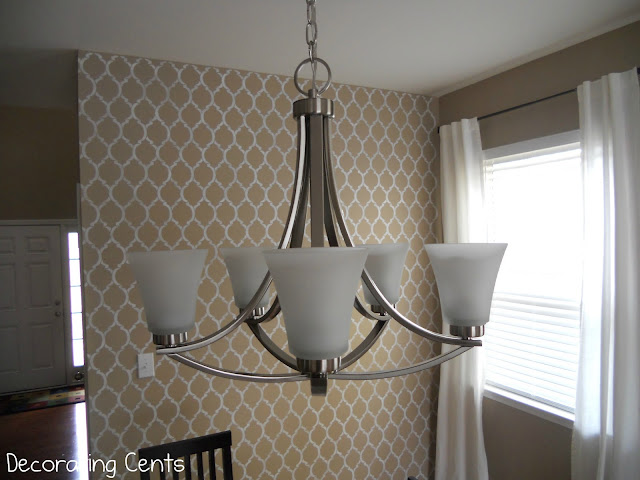
I finally found a chandelier I like.  It wasn't one of the options I showed you a couple weeks ago.  I just happened to be in Lowes returning another light when I saw this one.  It had the lines I wanted without being too modern.  You won't believe how many lights I had before actually deciding on this one. I had the drum pendant from CB2 but once it was up (hubby held it up), I didn't think it fit the room.  It was a little too modern for me.  I didn't want something I would have to change again next year because I wasn't feeling it anymore.  I also think it didn't give off the amount of light I wanted for this room.  This light fits the room better and is more classic and can change with my evolving taste. I also found some art to fit between the two windows.  It adds some red to the room.  Now if I could just find a round mirror I like for the stenciled wall .  Sharing at

Framing The Bathroom Mirrors

Image
I wanted the bathroom mirrors framed.  I didn't really like how they floated on the wall.  Here's how we did it. Supplies used: Miter box and saw four 7' pieces of fiber board casing paint liquid nails caulk We started by choosing the frame material we wanted.  Lowes has several options.  We chose to go with a fiberboard since it was lightweight and probably wouldn't warp over time due to the moisture in the bathroom.  We also chose the darker, wood-like board since we were painting the frame dark anyway to match the painted vanities.   Our bathroom mirrors are 42" tall and 35.5" wide.  Our frame would sit right on top so these are the measurements we wanted the outside of the frames to be.  After choosing the frame material, we went over the cutting desk and found out their cutting machine only makes straight cuts, not 45 degree angles.  Um...how can that be?  What if I don't have a saw at home?  The associate pointed i

Dry Erase Menu Board

Image
Young House Love and Bower Power have issued a Pinterest Challenge Winter Edition .  Just the kick in the butt I needed to get some projects on my Project Ideas board done.   We needed a menu board for the kitchen.  Hubby is always asking what's for dinner.  I have it written on my notepad, but I guess it didn't do him any good there.  I pinned this a while back knowing I'd get back to it one day.  Well today is the day. Is started by printing a chevron background on regular printer paper from here .  Using Word and the font Britannic Bold, I typed a template with menu at the top and my day of the week letters down the side.  I stuck the chevron paper back in the printer and printed the template on top. Using white paper, I cut rectangles to write the menu items on and taped them down on top. Put it back in the frame and voila. Sharing with Hi Sugarplum * Young House Love * Bower Power * The Great Indoors * Ginger Snap Crafts