Posts

Showing posts from 2016

Favorites of 2016

Image
Can you believe only one more day of 2016 left?  Where does time go? Christmas was great and the house is filled with new toys and excited kids.  I tried something new this year and used the traditional red in my Christmas decor.  I really like it. I like to go back and see what all I've accomplished over the year.  Let's re-cap projects of 2016 shall we? The biggest was probably my son's room makeover . I love the DIY engineering print I put on his wall. I replaced the shelves above his dresser with a photo gallery. My husband and I took a leap and opened an Etsy shop .  More gr eat prints are coming in the new year. I started my daughter's room makeover this year too!  The walls have gone from green to gray and some minor changes to the room like gold polka dots have made the room feel girly and g lam .  It's taken me a little longer than I planned but I am 99% done. We've been in our home f

Thanksgiving Table

Image
Happy Friday everyone! We are less than a week out from Thanksgiving.  I am so ready to spend time with friends and family and stuff my face with good food.  We are hosting this year so I've been playing around with a tablescape.  I wanted to keep it simple but still look nice. Of course I had to use my blue! I layered a gold charger with a simple white dinner plate and blue salad plates. Who knows if it will actually look like this Thanksgiving afternoon when it's eating time.  We usually do buffet style and I have way more people coming than this table will seat.   You're reading Thanksgiving Table b y Andrea, originally posted on Decorating Cents .  If you've enjoyed this post, be sure to follow Andrea on Facebook , Pinterest , Bloglovin , Instagram , and Hometalk .

DIY Wooden Bead Garland

Image
These bead garlands have been popping up all over the place.  I've seen them in so many vignettes around blogland and I knew I wanted some.  Thing is I never actually looked for them.  It was something I knew I could make.  Well fast forward a few months and that's exactly what I did. This was a super simple DIY.  I bought two sizes of wood beads from Michael's.  I bought the ones with holes already in them but they do carry more sizes that do not have holes.  I wasn't in the mood to drill my own holes.  I also bought some twine for stringing the beads. I laid out my beads how I knew I wanted to string them.  I put the larger beads in the center and placed the smaller beads along the ends for a graduated look. I strung my beads onto the twine and spaced them out slightly so my garland would have some give to it.  If not, the strand would be too stiff and not move much.  I knotted the ends, cut the excess twine and voila, I was done.  I kept mine

New Storage Ottoman

Image
How many of you can relate to too many toys in the family room?  I sure can.  We have had the same brown, faux leather ottoman for several years.  It did the job of storing and hiding toys that the kids kept downstairs.  I didn't think there was any other way.  Ever since we moved, I thought it looked too small in our space.  It wasn't large enough for more than one person to actaully put their feet up and the cushion on top was no longer plush.  There came a point one day where I was tired of picking up toys that my kids had pulled out and left out.  I wanted something different. I really wanted a coffee table.  I begin looking and found several that I liked.  I was going for something with a wood and metal combo like below.  The more I thought about it, the more I was afraid of one of the kids hitting their head on the corner of it.   source   So I went back to the beginning and thought I could marry having a soft ottoman top with a coffee table look.  So I l

Wooden Blessed Sign

Image
Is it M onday already ?   I don't know about you guys, but I have lots of wood scraps laying around in the garage.  I decided to put them to use.  I like quote signs so this was an obvious choice.   I chose a small piece of 1x4 and got to work.  With the addition of craft paint and a brush, this was an easy little project. I first painted my wood with some black craft paint usin g m y foam brush .  Since I don't have a cutting machine and I didn't bother to print and trace a stencil, I free-handed the words in pen cil so I could e rase if I m ade a mistake.  W hich I did several times .  I chose the word blessed. After a few coats of white paint to fill in my words, I had a cheap little sign I could put anywhere.  I used a tiny bristled brush for this step. I paired it with my painted pumpkins for fall in the dining room. How cute is this little wire ba s ket I found in Do llar Tree? I know with all the wood scraps I have, I

Behr Color Currents 2017

Image
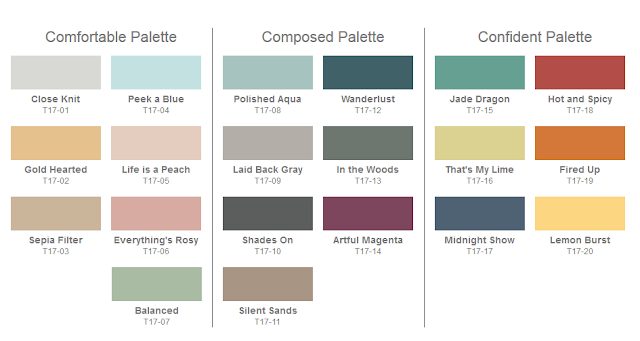
The paint most used in my house is Behr.  It's affordable and the paint is easy to work with.  When I buy it, I know what I'm getting myself into. Recently I saw they posted the color trends for 2017.  These are 20 limited edition colors that are trendy and will help you create a loved and livable home.  You can choose colors to fit your personality. I think I am more drawn to the Composed Palette.  I am more into blues and grays.  According to Behr, the Composed Palette includes earth tones and jewel tones.  They are more of a backdrop to allow you to show off your other decor.  I love the Laid Back Gray and Wanderlust.  They are very similar to colors I already have in my home. The Confident Palette has brighter colors.  They are adventurous and more dramatic.  These are colors I would consider accents or used more for the decor and not the walls.  But like the name says, if you want to make a statement, use a fun color.  I think these colors would look